Earlobe
Piercing
Advance notice: I have
no medical training. This is not
medical advice.
At almost 70 years old, I pierced my
own earlobes. Why? Decades of life's events, heavy dangly
swinging earrings, and minor accidents over the years had
resulted in the holes in my earlobes being stretched-out
and ugly. There were many earrings that I no longer could
wear. In November 2019, I had repair surgery on the
earlobes. Total surgery cost was $1,400, done by a
plastic surgeon in Bethesda, Maryland. Surgery was
painless and took less than 30 minutes; stiches came out
seven days after the surgery. Eight weeks post surgery,
the scars were barely visible. Doctor had said that the
lobes could be pierced again after eight weeks. She also
said not to pierce at or thru the scars.
Basic research had me decide against a
piercing "gun" or any device that pushed a stud
thru the lobe. That method is harsh on skin and can cause
trauma. My skin is old, and there already was a scar in
each lobe. Best method for the skin would be needle
piercing with a hollow surgical needle that came to a
triangular point. Piercing needles are similar to
hypodermic needles -- the needles used for injecting
medicine. (Perhaps they are the same thing with different
names.) Unfortunately, every piercing salon I contacted
said, "No piercing until one year after the repair
surgery." One year for a 70-year-old woman is a long
time; it could be a tenth of my remaining life, or maybe
even more than a tenth. I'd worn earrings every day since
old Doc Spalding pierced my earlobes when I was 16 until
November 2019 when the lobes were repaired. Waiting a
year was not an acceptable option.
Thus, because no "professional
piercer" would help, after 12 weeks of healing for
the earlobes, I decided to pierce them myself. Having
opted to birth a baby at home in 1984, deciding to pierce
my own earlobes was nothing.
First, a list of the supplies and
explanations:
SUPPLIES:
- Numbing
cream: Mithra+ 10%
lidocaine cream.
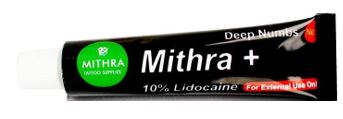
Why 10% lidocaine?
Because I don't like pain. I found a few mentions
of the product online, and I saw a YouTuber
pierce her own earlobes after application of 10%
lidocaine. She said that she could not feel
anything, and her face showed no sign of any
pain. The product is not available over the
counter in the USA. I found it for sale online HERE. It ships from Asia. It took about 10
days to get to me in Maryland, USA. Cost was $15.
My earlobes were totally numb, and I did not feel
anything -- not even the slightest pinch. My
earlobes were "dead" to any touch.
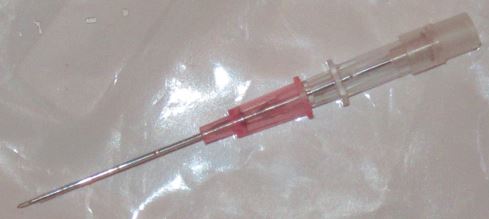
- Needles: 20-gauge cannula piercing needles.
Why cannula needles rather than typical
piercing needles?
Because the cannula-needle system allowed for
easier insertion of the ear stud, and because it
got the needle out of the picture as soon as
possible. A cannula needle is basically a
piercing needle inside plastic tubing. The needle
pierces, and the tubing goes right along with the
needle.
Why 20-gauge rather than 18-gauge?
Because I wanted the tiniest hole possible, and
because I reasoned that the smaller cut from the
20-gauge would hurt less than a cut from the
slightly larger 18-gauge.
Where does one find cannula needles?
Online, from several sources. They come
pre-sterilized in a sealed package, typically
five to a sealed package. (Five for $9, at
Amazon.) Inside the package of five, each
pre-sterilized needle is inside a hard-plastic
two-piece casing that is sealed with a strip of
paper tape.
Note #1: Needles must NOT
be reused. One must use a new needle for each
piercing.
Note #2: Once the needles arrived, I used
one needle from the package to figure out how the
cases opened and to look over the actual needle
and tubing, so as to figure out how things would
happen, and to figure out how to hold the needle
with my fingers to do the piercing.
Understanding the cannula-needle system was
important. Here are photos and words, with an
attempt to explain:
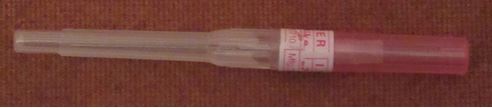
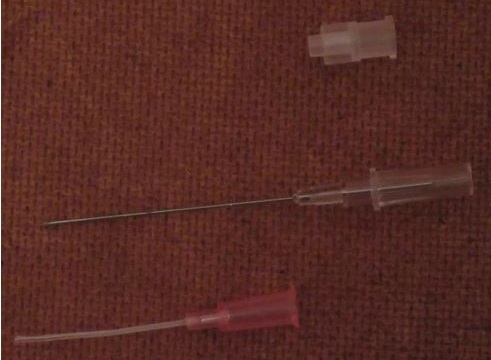
This image shows the needle inside the case. It
is sealed in the middle with a paper tape. From
end to end, it is five inches long.
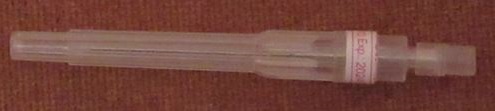
This next image shows the pink side of the case
removed. The needle (with cannula) remains inside
the clear portion of the needle case. From end to
end, it is four-and-one-eighth inches long:
The next image shows the bottom portion of the
needle case removed. From end to end, that is
three-and-a-half inches. The needle itself that
extends from hard plastic is
one-and-seven-eighths inches long. Surrounding
the needle is the thin, see-thru cannula tube. It
is next to impossible to see that cannula tube in
this image:
In this next image, the cannula
tube can barely be seen. It is tight around the
needle; however, on the left side of the image,
it can be seen where the tube ends and where the
needle extends just beyond the tube:
Examining more closely, here are
the three parts, separate. On the bottom is the
cannula tube, with a pink plastic piece attached
on the right side. Above the tube is the needle,
embedded inside a hard piece of plastic; the
needle is never removed from that hard piece of
plastic; the needle extends one-and-seven-eighths
inches from that hard piece of plastic. At the
top is a clear, hard-plastic cap. I opted to
remove that piece because manipulating the needle
felt easier with that cap removed.
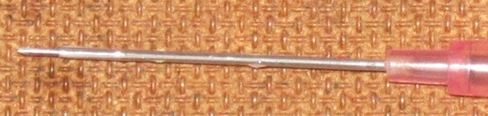
Next image shows the point of the needle itself,
on left-side of image. Notice that the needle is
hallow and comes to a triangle point. The needle
itself works like a surgical knife. It is that
knife-like function that is better for the ear
lobe than the punch of a piercing gun:

- Ear studs: unalloyed commercially pure (CP)
titanium studs, with extra long posts and
"butterfly" backs.
What exactly?
I found what I wanted sold online, called "Titanium Healing/Starter
Post Earrings." They are made of pure grade
2 titanium. They are tiny "dots" (4 mm
spheres) on 13 mm long posts: $35.
Why unalloyed titanium?
Because it has no nickel. Of all available
metals, unalloyed titanium is the least likely to
cause allergic reactions.
Why extra long posts?
Because earlobes swell in the first days after
piercing. The post needs to be long enough to
accomodate the swell of the earlobe.
Why butterfly backs rather than internally
threaded screw-on ear studs?
Because a butterfly back is easier for my
slightly arthritic hands to manipulate.
Why studs rather than hoops?
I want the healed pierced "tunnel" to
be a straight tunnel, rather than a curved tunnel
as would result from the curve of the wire on a
typical hoop earring.
- Clamps: disposable slotted Pennington
forceps/clamps.
What do they do?
The clamp holds the skin in place, front to back,
to make for a straighter piercing. Pressure of
the clamp might provide additional numbing, but
that was not needed.
Where does one find them?
Online, from several sources. They arrive
pre-sterilized, each in its own sealed plastic
bag. (Ten for $10, at Amazon.)
Here is an image of the forceps:
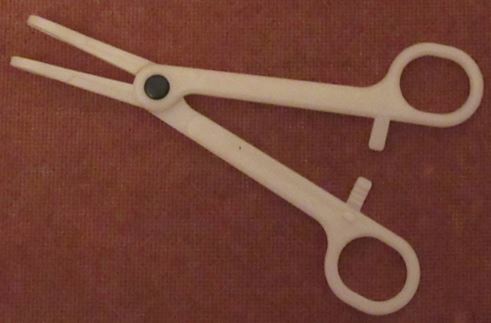
Here is an image with a close-up view, showing
the opening:

- Surgical
rubber gloves.
Why?
Because no one can get her hands absolutely
clean.
- 70%
isopropyl alcohol.
- Individual
alcohol prep wipes.
Why?
Because one cannot overdo germ killing when
puncturing one's skin.
- Extra-strength
Tylenol.
- Cotton
balls.
- Single-edge
razor blades: new,
in unopened hard-plastic dispenser pack.
Purpose?
Blade was to slice off plastic gizmo on end of
the tube, once the tube was thru my earlobe.
Note: Dispenser pack has one side of the
container for disposal of used blades.
- Markers: new, extra-fine-point, water-soluble
markers.
Note: Use a new marker for each ear.
- After-care:
Sterile saline
wound wash in spray can.
Bactine Max.
Additionally, I had a large stainless
steel tray, washed and wiped down with isopropyl alcohol.
The tray was for holding supplies during the piercing.
FIRST:
The process began 24 hours before the piercing:
No milk or alcohol for 24 hours before the piercing. Why?
Milk and/or alcohol can reduce the effect of the
lidocaine cream.
SECOND:
Eight hours before the piercing, the ear-studs
and butterfly backs went into a container of isopropyl
alcohol, making sure that they were completely covered
with alcohol.
THIRD:
Two hours before the piercing, I took
extra-strength Tylenol, for added pain relief.
FOURTH:
An hour before piercing, the numbing began.
Here's how:
- Tied back hair.
- Washed area with soap and water.
- Covered each earlobe with hot
washcloth for 5 minutes, so as to open pores to
help the lidocaine get into skin.
- Applied isopropyl alcohol with
cotton balls. Dried completely with fresh cotton
balls.
- Covered front and back of each
earlobe with 2 to 3 mm thickness of lidocaine
cream.
- Sealed over with Saran Wrap (clear
plastic wrap).
- Waited 30 minutes.
- After 30-minute wait, cleared off
each earlobe with tissue.
- Applied fresh layer of lidocaine
cream.
- Sealed again with Sarah Wrap.
- Waited another 30 minutes.
- Then, wiped off numbing cream with
tissue.
- Wiped front and back of each lobe
with alcohol-soaked cotton balls.
FIFTH:
Once totally numb, the steps toward piercing
began.
- Sliced thru paper tape holding
together the two parts of the hard-plastic cases
holding the two cannula needle. Did not want to
be fiddling with that later.
- Put on rubber gloves.
- Removed ear studs and backings
from alcohol; placed on alcohol-wiped stainless
steel tray.
- Once more, cleaned front and back
of earlobes with alcohol-soaked cotton balls.
- Next, wiped lobes w/ a fresh
alcohol prep. (You canNOT do too much germ
killing.)
- Used new marker on each earlobe to
put a tiny dot, marking exactly where to pierce
lobe.
- I had scar tissue. I had to be
sure NOT to pierce thru the scar tissue. I opted
for directly behind the verticle scar.
- Clamped 1st earlobe, positioning
clamp such that dot was inside open area of
clamp.
- Opened hard-plastic case that held
new cannula needle. Removed needle.
SIXTH:
The actual piercing.
- Holding needle in fingers as I'd
previously figured out how to do with practice
needle, pierced earlobe at mark, inside open area
of clamp. There was absolutely no feeling. Understand: It's not that it
was "bearable pain." Rather, not only
was there zero pain, there was absolutely NO feeling.
- Pushed needle entirely thru lobe.
Actual piercing did not take one second.
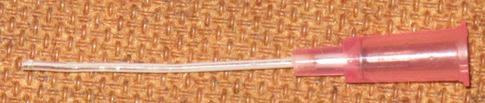
- Then, pulled needle from the tube
and left plastic tubing thru earlobe. This is an
image of the tube then left going thru my ear
lobe. From end to end, this thing is just a hair
over two inches long. The amount of tubing that
extends beyond the pink plastic end (that is on
the right side) is an inch-and-a-quarter long.
- Pushed tubing thru earlobe until
plastic piece on end of tubing stopped tube from
going thru lobe.
- Put needle back inside
hard-plastic casing that it came in. Placed it
safely aside.
- Back to earlobe:
Held tubing in place, and removed clamp.
- Adjusted tubing so that there was
some more tubing on front side of lobe.
Held tube in position on back side of earlobe.
- Used new razor blade to slice off
plastic attachment at end of tube.
- While holding tube in place from
backside, inserted post of ear-stud into open end
of tubing on front side of earlobe.
- With post of ear-stud inside tube,
pushed ball of ear-stud such that tubing went
thru earlobe. Stud moved right into place.
- Pulled tubing off back of
ear-stud.
- Pushed on butterfly backing.
The entire sixth step -- from picking
up the needle to pushing the butterfly back onto the
ear-stud -- took less than three minutes, perhaps less
than two minutes.
SEVENTH:
Earlobe was pierced, and ear-stud was in place.
- Cleaned earlobe again with
alcohol-soaked cotton balls, front and back.
- Sprayed with Bactine Max, front
and back.
EIGHTH:
Repeated exactly for second earlobe.
NINTH:
Needle disposal: For safety, used duct tape to
wrap around each container holding a needle. Different
areas have different laws regarding needle disposal, but
securing each needle inside its hard plastic container
was the first step.
TENTH:
Aftercare.
- Clean piercings twice daily with
sterile saline wound wash.
- For good measure, spritz with
Bactine Max once a day.
- Initial studs stay in place for
eight weeks.
- For the 1st changing, use cannula
tube from another needle for an assist:
Remove butterfly backing.
Push tube onto stud post on the backside of your
earlobe.
Slide stud out, and the tube will come thru the
piercing hole, moving with the stud since the
tube is pushed onto the stud.
From the front side, remove trainer stud from
tube. Insert stud of new earring into tube. Push
earring in place. Remove tube from back of new
ear stud. Secure the earring.
- As to choice of earrings for the
1st changing, I opted for small hoops with a
straight wire going thru the ear. The straight
wire is the size and weight of a typical ear
stud. The hoops are about the size of a dime
(enlarged in this image):

With the change to such hoops, both the front and
back of the earlobes were open for healing. The
straight post going thru the lobe allowed the
"tunnel" to continue to heal as a
straight tunnel. About three weeks later, I
changed to gold wires. Why? It allowed complete
exposure of the skin and the easiest cleaning
possible. The internal scar of the
"tunnel" will continue healing and
building for about a year. The proper name for
that skin tunnel (or "skin tube") is
"fistula." My choices at every point
were made with the hope of getting a good fistula
in each earlobe. For a year, I shall baby that
fistula.
Again: I have no medical training. This
is not medical advice. This is
what I did and what worked for me.
This is a far cry from the method that
I used for some girlfriends back in the 1960s: I used a
big sewing needle. The only "numbing" was from
ice cubes; ice cubes can do things to the skin such that
there can be tissue damage while piercing. The sewing
needle just punched thru; it did not slice such as a
piercing needle does. Once the hole was punched, then I
had to work the post of the ear-stud or ear wire thru the
hole. Sometimes, it amounted to a re-piercing. It was a
crude method of ear piercing, but all of my victims
survived.
|